expressjs集成swagger文档express-swagger-generator和swagger-ui注释配置的两种方法,query传参body传参url传参
集成express-swagger-generator
安装swagger依赖包
npm install express-swagger-generator
app.js中初始化
js
const expressSwagger = require('express-swagger-generator');

let options = {
  swaggerDefinition: {
    info: {
      description: 'This is a sample server',
      title: 'Swagger',
      version: '1.0.0'
    },
    host: 'localhost:3000',
    basePath: '/',
    produces: ['application/json', 'application/xml'],
    schemes: ['http', 'https'],
    securityDefinitions: {
      JWT: {
        type: 'apiKey',
        in: 'header',
        name: 'Authorization',
        description: ''
      }
    }
  },
  route: {
    url: '/swagger',
    docs: '/swagger.json' //swagger文件 api
  },
  basedir: __dirname, //app absolute path
  files: ['./routes/*/*.js'] //注意这块的配置,要和你项目目录层级一致
}
expressSwagger(app)(options)
给接口添加文档注释
js
/**
 * @typedef fList
 * @property {integer} fid
 * @property {string} fname - Some description for point - eg: 1234
 * @property {string} flink - Some description for point - eg: 1234
 * @property {string} fIcon - Some description for point - eg: 1234
 */
/**
 * @typedef Response
 * @property {[integer]} code
 * @property {Array.<fList>} fList
 * @property {Array.<fList>} bList
 */
/**
 * 友情链接
 * @route GET /publicRouter/friend_link
 * @group public - 公共模块
 * @returns {Response.model} 200 - 友情链接数据
 * @returns {Error}  default - Unexpected error
 */
router.get('/friend_link', friendLink_controller.friendLink)
效果如下: 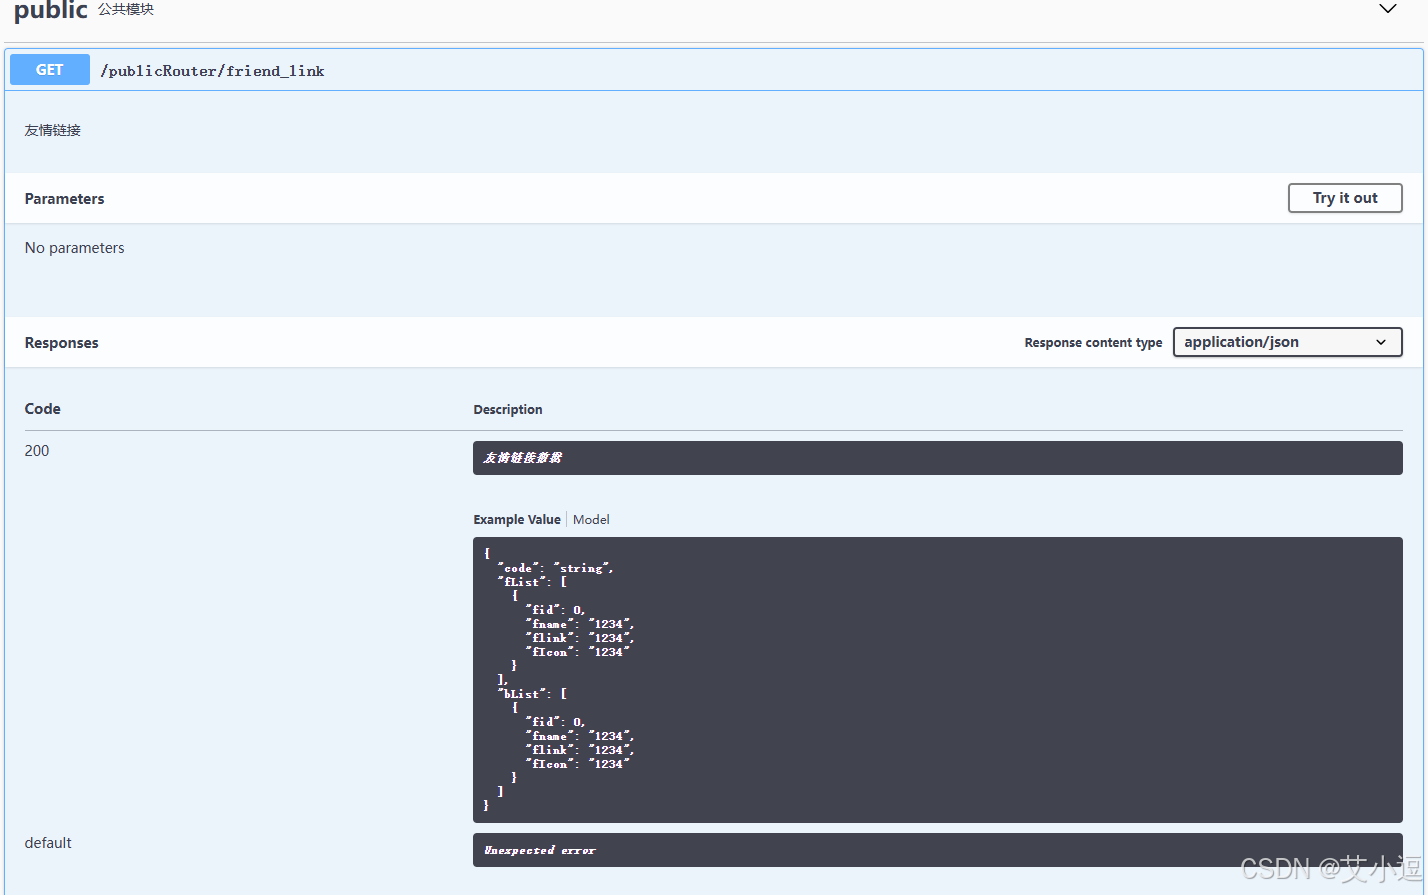
参数&响应写法
required 是必填项,可选参数。
- url传参:@param {string} email.query.required - username or email
- body传参:@param {Point.model} point.body.required - the new point
- 响应:@returns {Response.model} 200 - An array of user info
- url传参:@param {string} typeClass.path - 分类类别,typeClass对应url参数
- url设置:@route GET /account/account_type_list/
js
/**
 * @typedef Product
 * @property {integer} id
 * @property {string} name.required - Some description for product
 * @property {Array.<Point>} Point
 */

/**
 * @typedef Point
 * @property {integer} x.required
 * @property {integer} y.required - Some description for point - eg: 1234
 * @property {string} color
 * @property {enum} status - Status values that need to be considered for filter - eg: available,pending
 */

/**
 * @typedef Error
 * @property {string} code.required
 */

/**
 * @typedef Response
 * @property {[integer]} code
 */


/**
 * This function comment is parsed by doctrine
 * sdfkjsldfkj
 * @route POST /users
 * @param {Point.model} point.body.required - the new point
 * @group foo - Operations about user
 * @param {string} email.query.required - username or email
 * @param {string} password.query.required - user's password.
 * @param {enum} status.query.required - Status values that need to be considered for filter - eg: available,pending
 * @operationId retrieveFooInfo
 * @produces application/json application/xml
 * @consumes application/json application/xml
 * @returns {Response.model} 200 - An array of user info
 * @returns {Product.model}  default - Unexpected error
 * @returns {Array.<Point>} Point - Some description for point
 * @headers {integer} 200.X-Rate-Limit - calls per hour allowed by the user
 * @headers {string} 200.X-Expires-After - 	date in UTC when token expires
 * @security JWT
 */
router.post('/friend_link', friendLink_controller.friendLink)
遇到问题1:
由于我之前对404访问的路由有拦截处理,所以访问 http://localhost:3000/swagger会报404错误
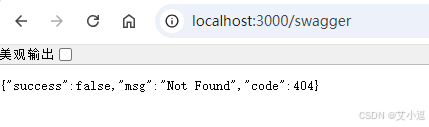
拦截代码如下:app.js
js
// catch 404 and forward to error handler
app.use(function(req, res, next) {
  // 添加如下if判断代码就可以正常访问了
  if(req.url.indexOf('/swagger') !== -1) {
     next()
     return
   }
  res.send({success: false, msg: 'Not Found', code: 404});
});
遇到问题2:
配置好后swagger正常打开,但没有配置的接口,是由于options->files的层级配置的不对。 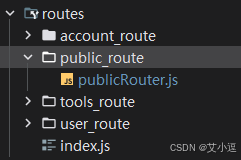
配置环境变量,部署后设置swagger地址
安装cross-env
npm i - D cross-env
修改启动命令
json
"scripts": {
   "start:dev": "cross-env NODE_ENV=development node-dev ./bin/www",
   "start": "cross-env NODE_ENV=production node-dev ./bin/www"
 },
配置swagger配置
通过环境变量,动态设置host【如果有其他更优方案,欢迎大家评论指正】
js
const _env = app.get('env');
let options = {
  swaggerDefinition: {
    info: {
      description: 'This is a sample server',
      title: 'Swagger',
      version: '1.0.0'
    },
    host: _env === 'production' ? 'aixiaodou.cn' : 'localhost:3000',
    basePath: '/',
    produces: ['application/json', 'application/xml'],
    schemes: ['http', 'https'],
    securityDefinitions: {
      JWT: {
        type: 'apiKey',
        in: 'header',
        name: 'Authorization',
        description: ''
      }
    }
  },
  route: {
    url: '/swagger',
    docs: '/swagger.json' //swagger文件 api
  },
  basedir: __dirname, //app absolute path
  files: ['./routes/*/*.js'] //Path to the API handle folder
}
expressSwagger(app)(options)
配置服务器内pm2启动
新建ecosystem.config.js文件,使用pm2启动 pm2 start ecosystem.config.js
js
module.exports = {
  apps : [
    {
      name: "serve",
      script: "yarn start",
      watch: true,
      env: {
        "NODE_ENV": "production",
        "PORT":3000,
      }
    }
  ]
}
集成swagger-ui
安装依赖包
npm install swagger-jsdoc swagger-ui-express
app.js中初始化
js
const swaggerJsDoc = require('swagger-jsdoc');
const swaggerUi = require('swagger-ui-express');
const _env = app.get('env');
console.log('当前环境:' + _env);
let options = {
swaggerDefinition: {
openapi: '3.0.0',
info: {
description: '',
title: '艾小逗开发文档',
version: '1.0.0'
},
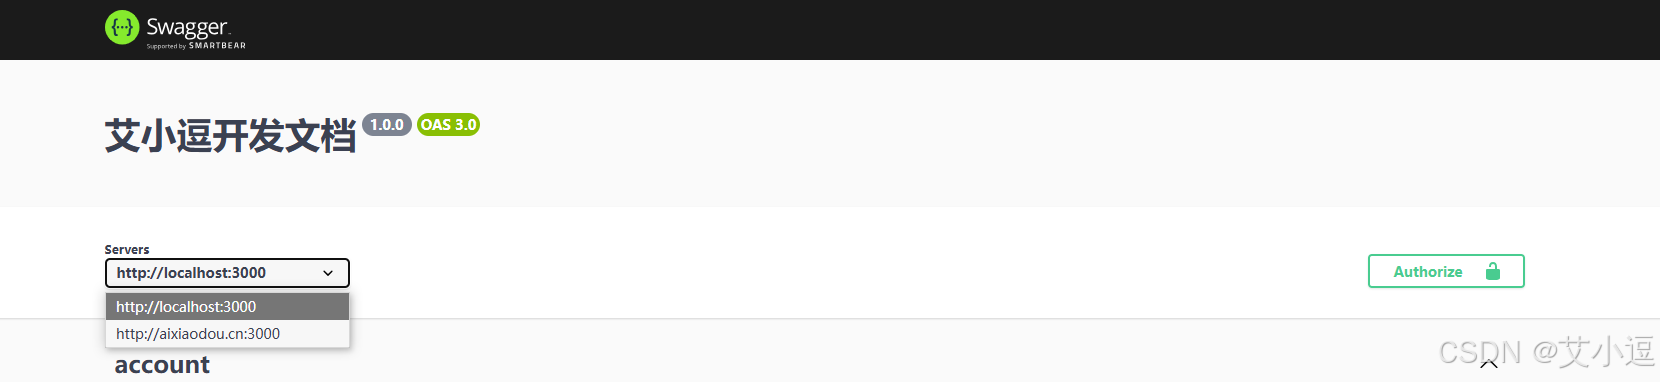
servers: [
{url: 'http://localhost:3000'},
{url: 'http://aixiaodou.cn:3000'}
],
components: {
securitySchemes: {
bearerAuth: {
type: 'apiKey',
in: 'header',
name: 'Authorization',
bearerFormat: 'JWT',
},
},
},
security: [
{
bearerAuth: [], // 默认应用 JWT 认证
},
],
},
apis: ['./routes/*/*.js'] //Path to the API handle folder
}
// 生成 Swagger 文档
const swaggerDocs = swaggerJsDoc(options);
// 使用 Swagger UI
app.use('/docs', swaggerUi.serve, swaggerUi.setup(swaggerDocs));给接口添加文档注释
js
/**
 * @swagger
 * /publicRouter/friend_link:
 *   get:
 *     tags:
 *       - public
 *     summary: 友情链接
 *     description: 获取友情链接数据
 *     responses:
 *       200:
 *         description: 友情链接数据
 *         content:
 *           application/json:
 *             schema:
 *               type: object
 *               properties:
 *                 code:
 *                   type: integer
 *                   description: 状态码
 *                 fList:
 *                   type: array
 *                   items:
 *                     type: object
 *                     properties:
 *                       fid:
 *                         type: integer
 *                         description: 友链id
 *                       fname:
 *                         type: string
 *                         description: 友链名称
 *                       flink:
 *                         type: string
 *                         description: 友链地址
 *                       fIcon:
 *                         type: string
 *                         description: 友链图标
 *                 bList:
 *                   type: array
 *                   items:
 *                     type: object
 *                     properties:
 *                       fid:
 *                         type: integer
 *                         description: 友链id
 *                       fname:
 *                         type: string
 *                         description: 友链名称
 *                       flink:
 *                         type: string
 *                         description: 友链地址
 *                       fIcon:
 *                         type: string
 *                         description: 友链图标
 */
router.get('/friend_link', friendLink_controller.friendLink)
效果如下: 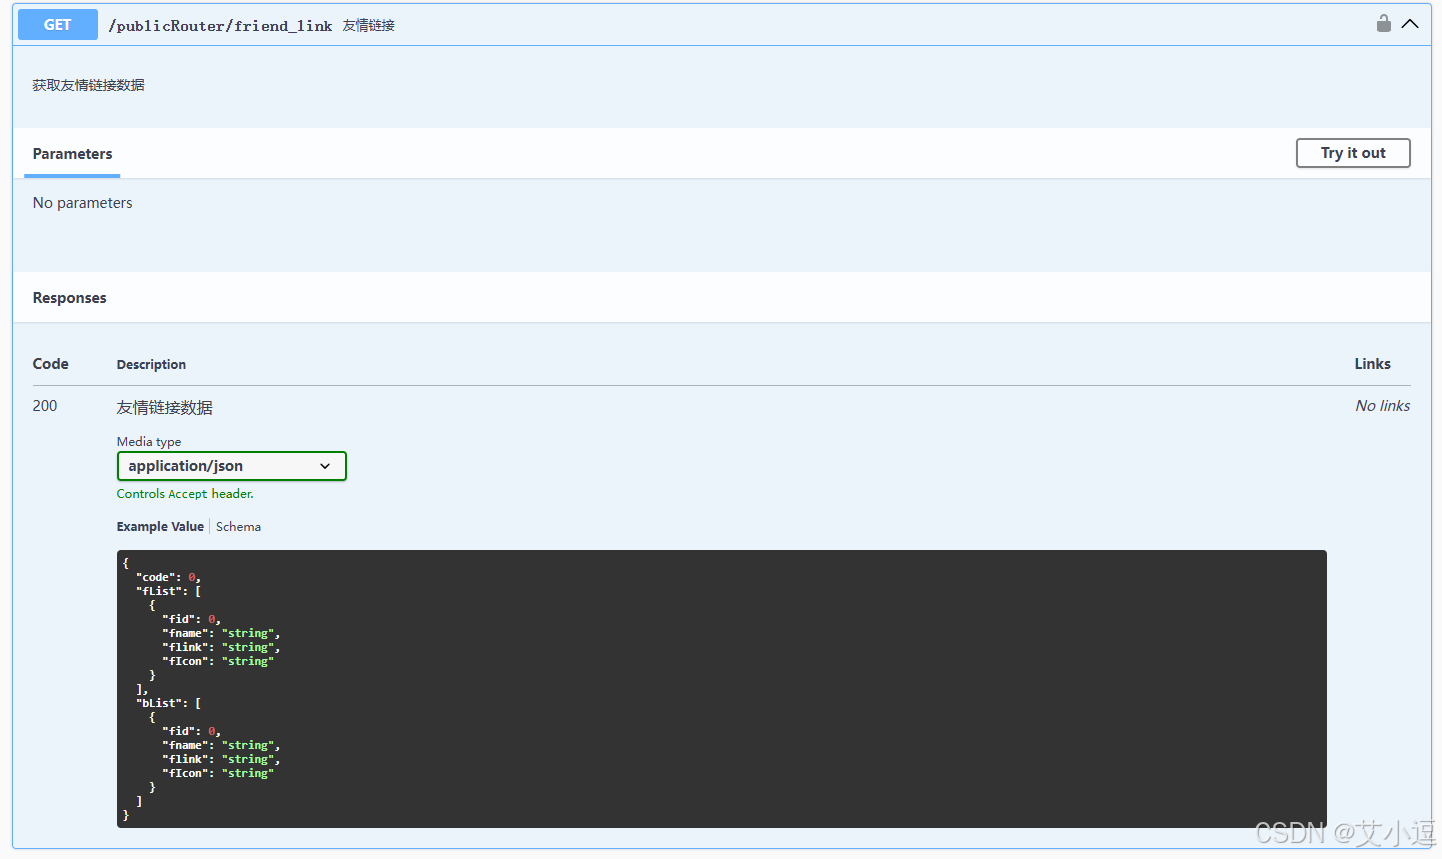
对比:
- swagger-ui使用的是openapi3.0,express-swagger-generator使用的是openapi2.0
- 注释写法有很大差别:可查看
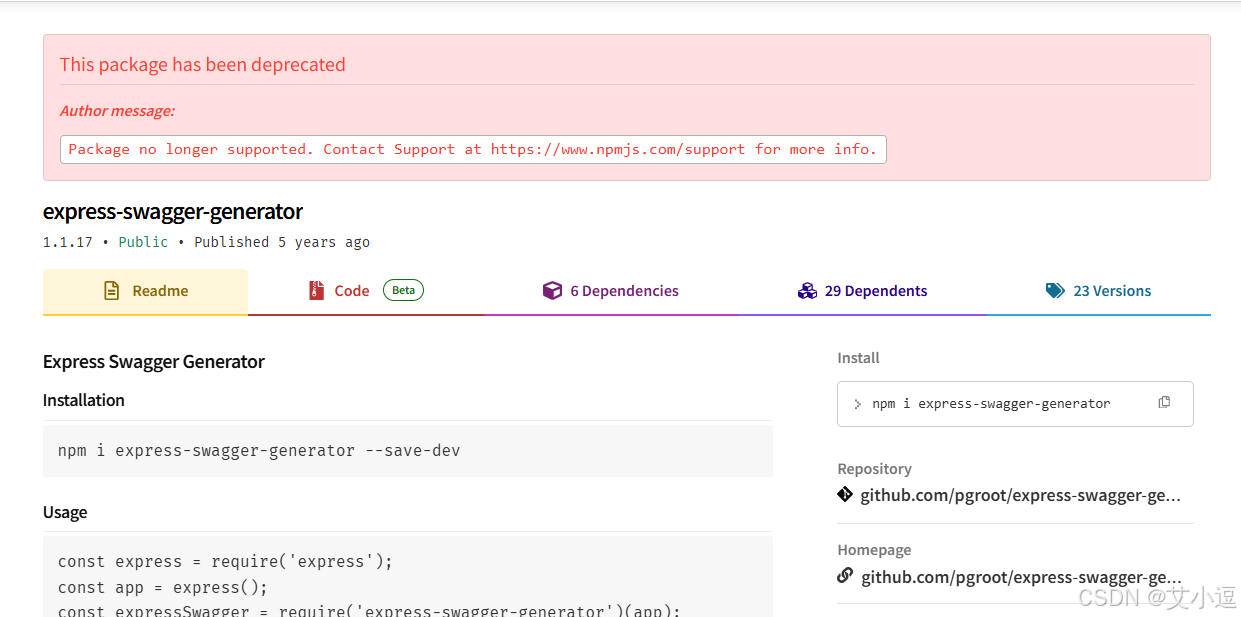
给接口添加文档注释对比下 - express-swagger-generator查看npm,已经停止维护了
- 跟人感觉express-swagger-generator写法简洁些,swagger-ui需要注意空格缩进。
- swagger-ui使用openapi3.0可以切换接口调用服务